WhatsApp
+62818-0847-5888
Work Hours
Monday to Friday: 9AM - 5PM
WhatsApp
+62818-0847-5888
Work Hours
Monday to Friday: 9AM - 5PM
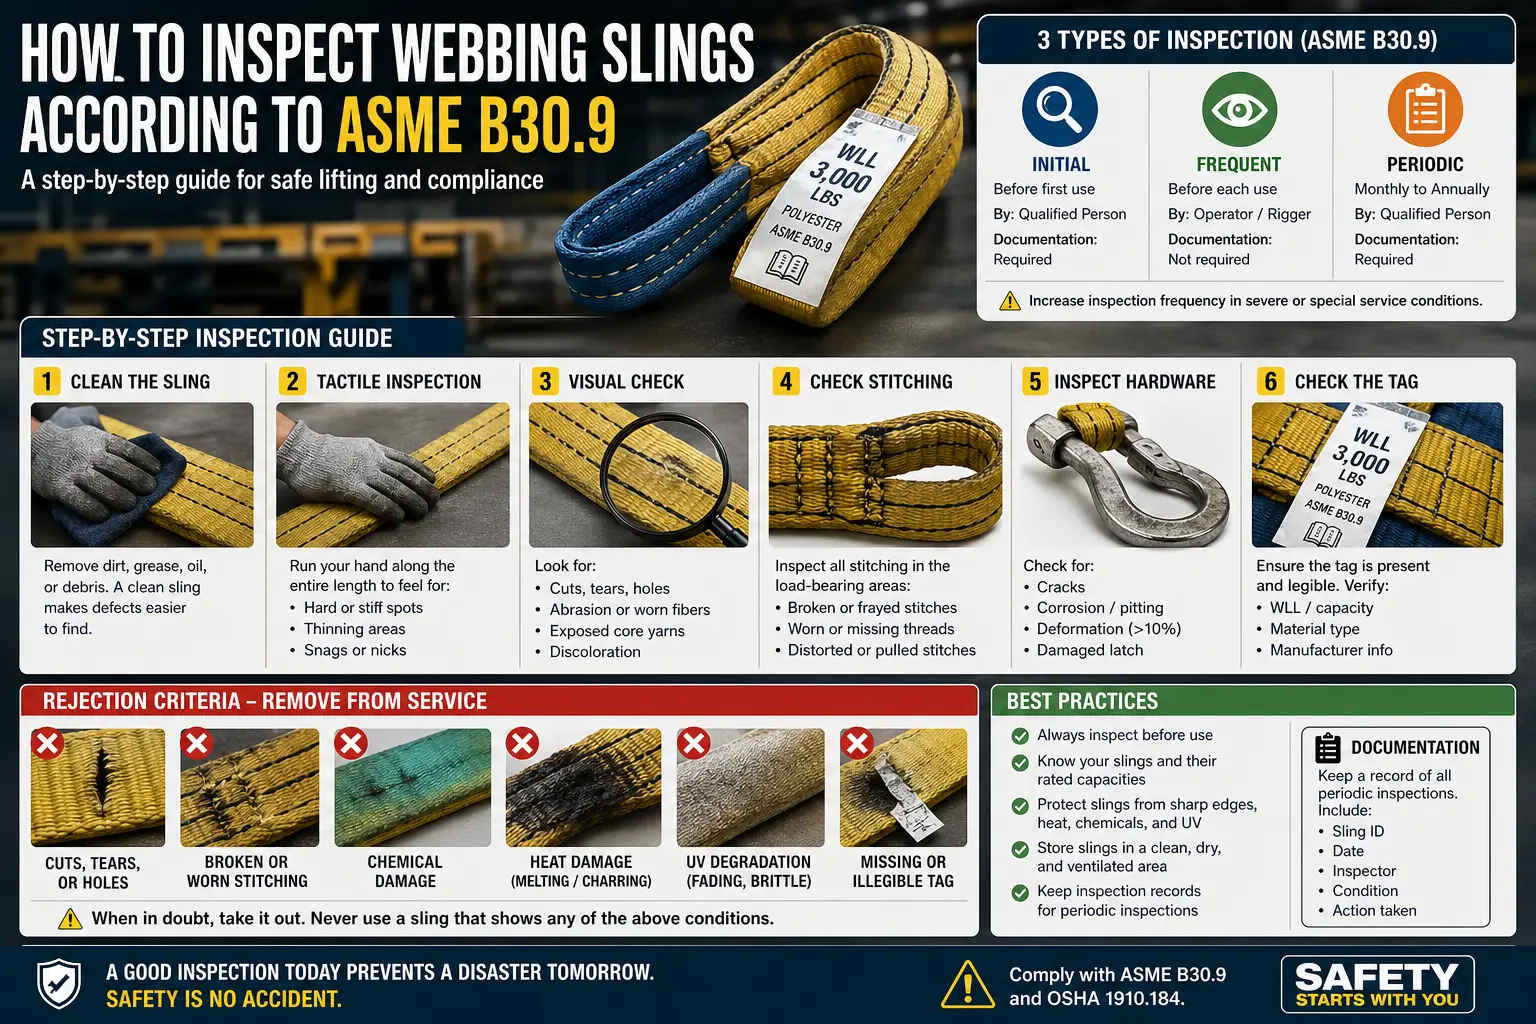
Sling failure is not an “oops moment.” When a sling breaks during a lift, the consequences are immediate dropped loads, potential fatalities, equipment damage, and serious legal and compliance issues.
The problem is, webbing slings often look perfectly fine even when they are already compromised internally, whether due to UV exposure, chemical damage, or overloading. A quick visual check is basically gambling.
That’s why understanding how to inspect webbing slings according to ASME B30.9 is critical and not just in theory, but as a practical, field-ready skill.
Unlike a cracked shackle or a bent hook, damage in webbing slings is often invisible.
The most dangerous mindset in the field “It still looks fine, just use it.” In reality, that’s exactly what leads to accidents.
ASME B30.9 defines a structured 3-level inspection system:
Purpose: ensure the sling is safe right from the supplier.
Focus: detect any new damage from recent use.
Intervals:
Many teams skip this. It’s actually the most critical for compliance.
Here’s the practical workflow you should follow:
Remove:
If it’s dirty, damage can be hidden.
Run your hand along the sling. Feel for:
Your hands often detect what your eyes miss.
Look closely for:
If core yarn is visible → immediate removal from service.
Focus on eye/loop areas:
If stitching is compromised, load capacity is compromised.
Check for:
Damaged hardware must be retired, not repaired.
The tag must be readable and include load capacity (WLL), material type and manufacturer. No tag = no use. No exceptions.
If you find any of these, the sling must be removed from service:
No matter how small. Why? Because it can lead to a “zipper failure.”
This is critical. Stitching is load-bearing, not cosmetic.
Signs include discoloration and brittle fibers
Acids damage nylon. Alkalis damage polyester.
Indicators:
Heat significantly reduces fiber strength.
Signs:
Often underestimated, but a major hidden risk.
Very common in the field.
Without a tag:
Which means: it cannot be used.
The most common mistake.
A quick glance is not an inspection.
Especially when slings are used:
UV damage is cumulative.
This is not a minor issue. It’s a compliance violation.
Common excuse, “We check them daily”
Problem:
No periodic inspection = compliance gap.
No records = no proof of inspection.
If an accident happens, auditors will request records. No records = weak position.
In most cases: No. Only the manufacturer can repair and re-certify.
Webbing slings may look simple, but the risks are serious.
ASME B30.9 provides a clear framework. The real issue is not the standard, it’s discipline in applying it.
Proper inspection = a safety system
Poor inspection = a ticking time bomb
And in reality:
The sling that fails is almost always
the one that “looked fine.”
PT. Sebatek Prima Tunggal | Lifting Equipment & Rigging Solutions
Supplying industrial lifting and rigging equipment tested to international standards – with the documentation to back it up.
© sebatek.id | “How to Inspect Webbing Slings According to ASME B30.9” | Indonesia Polyester Manufacture